Hobby Lobby had a great apothecary shelf that inspired me! Our bathroom was needing a new shelf display over our toilet and it seemed to be the perfect style and look. I had some old dresser drawers that I knew would come in handy and this project was the perfect fit.
I did a full video tutorial on how I created a vintage style apothecary shelf from an old dresser drawer and some scrap wood. I hope you are inspired!
Rustic elegance added to our bathroom makeover. It's not a big makeover, but I don't think it takes much to change the entire look of a room when it comes to a small space like that. This farmhouse window was itching to come back into our home. It used it in my fall home decor, which you can see HERE.
A pinterest picture inspired me to transform the window into a rustic towel rack for the bathroom. I found a great chippy spindle at a reclaimed resale shop and combined the two to create a functional decor piece that I'm quite pleased with!
I share with you in the video tutorial below all the details of how it all came together. I hope you are inspired!
I just recently was introduced to the world of reclaimed resale shops. We have two great ones within an hours drive of my home. It's sort of a thrift shop with a twist.
Me and hubby made a trip to a very nice shop one Saturday for a child-less date. It was fabulous!
I really enjoyed looking at all of the old things that had been pulled out of old homes, buildings, businesses, churches, hotels, and more.
We both had a great time treasuring hunting.
This bi-fold door was one of the treasures I came home with. I knew just where and what I wanted to do with it when we found it. I believe I paid $10 or so for it.
To see this reclaimed door transformed into new dining room decor, check out my video tutorial below.
When it comes to decor, I love to try to make everything myself. It not only saves money, but it makes me appreciate the things that I have much more. This decor piece was one that I had my eye on, however the price was much much higher than what I'd ever pay for a shelf sitter. (Prices start at $70.00 and go up from there).
That's when I started dreaming up how I would create one myself for much much less. My version I was able to make for under $20.00! Although it may not be made of metal like the originals, it matches my decor since I was able to stain it in my favorite wood stain (Minwax Jacobean).
I created a DIY tutorial for this project so that you can see it make from start to finish. You'll also get to see the design process as I sort of created as the project went along. I hope you are inspired!
Unfortunately I don't have room in my home for a big extravagant coffee bar like I would love to have. However, I do have extra corner counter space in the kitchen so this is where I added a little "coffee corner" instead. The space needed some height to lift a few things out of the galvanized tray I have it all contained in. I grabbed a few scrap and extra items from my workshop and created this piece fairly quickly.
If you don't have the pieces laying around, it really is an expensive and easy project, great for beginners. The best part about this is you can create yours to fit your space and adjust the size and height. You can use finials for the bottom and also stain or paint it in the color that matches your home's decor.
I created an easy to follow tutorial in the link below. I hope you are inspired!
I really enjoyed the look of how our bedroom used to be decorated. We had a whole matching suite set, I creating some beautiful piece, and I really did love it. (You can see the before look HERE ) However, when we upgraded to a king mattress, it was time to also upgrade the headboard. I knew we could live without the headboard for awhile as long as we had the mattress, and we did... for about 3 months. Although I did have all the supplies for this build for just about that long. It's always just about, when we can get around to projects. I knew this one would be all of a two day process, although quite simple, just a little time consuming, so yes it did take 3 months to find two back to back days of free time to get to it. I'm so glad we finally did!
This headboard turned into exactly what I had envisioned in my head. I wanted something similar to one on Wayfair, however $700 was not in our budget. Instead we sort of picked pieces of this and that tutorial and sort of created our own way of doing things to get the look we wanted. I wanted something cozy, comfortable, and grand. A big focal point of the room. In the end, it all came together beautifully.
You can find the tutorial for how to Bleach Drop Cloth HERE
This is the inexpensive material I used for our headboard (only $20!). Make sure you have lots of staples on hand, because you will for sure be using lots of them. I share some short cuts and budget saving tips in the video linked below as well. I would say all in all this project cost us under $100. (Well worth the effort to save $600 off the Wayfair version I originally wanted). I hope the video tutorial inspires you! Enjoy!
I just love to decorate for this holiday! This year I was able to find some new accessories that just brought my home to life for the 4th of July. Really I didn't have to change much. It was very easy to incorporate some new throw pillows, stick some mini flags in my greenery pots, and weave some cute Target Dollar Spot finds onto some tables and shelves.
Although tomorrow is the 4th of July I may just keep this decor around till August arrives. It is very patriotic and great for the rest of the summer. I give you a full home tour of all the red, white, and blue decor I have this year! I hope you enjoy!
I'm sure we've all seen our fair share of IKEA hacks, but what about a Hobby Lobby hack? This store is killing me right now. They have so many great new pieces at such great prices, it's very hard to not find what I'm looking for. However, the perfect side table was no where to be found. I have a lovely little accent chair in my bedroom that desperately needed a side table. Unfortunately all the side tables were just too tall for it's short height. That's when things start getting crafty. If you can't find it, you start drumming up ideas on how it can be made. In comes Hobby Lobby...
I found some pretty amazing metal barrels, just the right height for my accent chair! Things get even more crafty from there and some DIY starts to happen. I share with you the whole process in the video tutorial linked below. I hope you enjoy!
It's sort of a miracle that I was able to find such great finds at this awesome Hobby Lobby sale! Everything I found was just right for my home's rustic farmhouse / industrial style. We are also redecorating our master bedroom so it was great timing as well! I went to two different Hobby Lobby's and both had a good selection as well as different things at both.
I share with you all of my clearance finds in the video linked below!
So simple, yet so chic! This dark wood and white combo is one of my favorites. It's a rich look and the perfect fit for my farmhouse kitchen. I have always wanted an "EAT" sign, or I at least wanted the words EAT to stand out somewhere in my kitchen. I had a little spot open above my kitchen cabinets so I ended up making a wood sign to custom fit in the space. It works just right!
Do you have room for a wood sign like this in my kitchen? I give you a complete video tutorial and steps to how you can create this wood sign for yourself in the link down below.
Our new puppy is just a little spoiled... ok a lot spoiled. He is our first family dog, so that may just have a little bit to do it. He is a medium sized dog, about 50 pounds (right now) and nearly a year old. Our vet says he shouldn't get much taller, but will likely put on more pounds. Since the height is what I was worried about with this project, I went ahead and made this bowl stand for him.
The dark stain and the white combo is what I'm obsessed with right now. It just is classy, has a lot of character, and really has that custom look. It wasn't hard to decide the look I wanted for our puppy's custom piece of furniture and I'm just giddy with the way it turned out.
I give you a complete rundown and tutorial of how this Dog Bowl Stand was made. I hope you are inspired!
From turquoise and lime to red, white, and blue! My front porch got a complete decor over all this summer. I like that it is transitional from the beauty of red and blue, to the holiday decor for 4th of July just by adding some American flags.
I give you an in depth tour of my front porch in the video linked below. You'll see the sitting area, the front flower bed, and also the front door entry. I hope that you are inspired!
IKEA obsessed? I think so! Or at least I am anyway. I just love that place. I'm a total sucker for all of it's advertising ploys, food specials, rows of stocked merchandise that look so appealing... even if you don't need an item or know what you'll do with it when you get home but you buy it anyway. Yep, that's me. Pure love.
We waited a long time to get an IKEA in our area. I had never been to one till this one was built. Even before it was open, I knew I'd have a love/love relationship with this amazing store.
Alright, enough about my odd love for IKEA. Onto the topic of this video haul. We are I am in the middle of a bedroom remodel. From blues and whites to neutral and farmhouse(y). I love (again I love), that IKEA has some great decor items that fit right into that decor theme. I give you a look into the items that I purchase for our bedroom makeover and also explain what I'll be doing with them all in the video linked below. I hope you are inspired!
If there is an easier way, I tend to go that route. Especially when it comes to crafting and decorating. My awesome mom passed this chair down to me when she got a new replacement for her home. I loved this chair, just not so much the yellow and orange accents. They matched her decor to a "T," however not so much my neutral color pallet farmhouse style home. I could have slip covered it. I thought about doing that with drop cloth. Then I thought, that will take a lot of time and some skills that I am not so sure I have (sewing). So maybe one day down the road I will get brave and slipcover something, but the project was not it.
Instead of slip covering the chair, I decided to enhance it's beauty. I used some chalk paint and a paint brush, that's it! Check out my video linked down below to see the before and after, as well as how I transformed this chair to match my bedroom's new style. I hope you are inspired!
I always say, save those scraps! I even go as far as cutting bad pieces of scrap off and keeping the good parts. They always seem to get used in some way or another, so it's always good to keep them around.
This wood sign is made with all scraps from my scrap pile. I ripped some 1"x12"s down and had nice square strips left over. Not knowing what they would be good for, I threw them into the scrap pile. Those pieces found their purpose in today's tutorial. They created this beautiful framed wood sign to celebrate the upcoming 4th of July holiday.
Font: Magnolia Sky
See all the details of this project and build in the tutorial I've created below.
This DIY was an inspiration from framed wood signs I saw at Hobby Lobby. Their prices are hard to beat at 50% off and I'm not against buying them to save myself the work of making them myself. However, the signs Hobby Lobby had were far too smaller for where I wanted to display them. That leads me to this tutorial.
I finally got around to making these framed wood signs for me and my hubby's bedroom. I had lots of left over pieces of 2x2's laying around which led to the creation of these chunky framed wood signs verses the normal 1x2's that I use for framing with. They are just perfect and I really love them.
I hope this video tutorial inspires you to get creative with your wood signs and your decor!
If you haven't seen my post and video tutorial on how to bleach drop cloth - you can see that here.
This is a continuation of that post, I'll be sharing how I turned those drop cloths into beautiful farmhouse style curtains!
I have a little twist to mine since they are used in my bedroom and I need black out curtains in there. It's a neat little trick I share with you in the video tutorial below.
Pinterest is so full of ideas and I try to stay off there because my mind starts getting stuck on my need to do all of the ideas I find. I came across this ladder and flag decor idea one day browsing Pinterest and knew I had to do it. It was easy and I had nearly everything on hand already. Those are the best projects, when you already have what you need.
You can use any sort of old ladder or build one of your own (like I did here with 1"x2"s). Wrap your ladder in a flag or fabric, whatever decor matches the season or your decor theme. This project really only took maybe 15 minutes. It was super easy and super quick.
I share with you how it all came together in my video tutorial linked below.
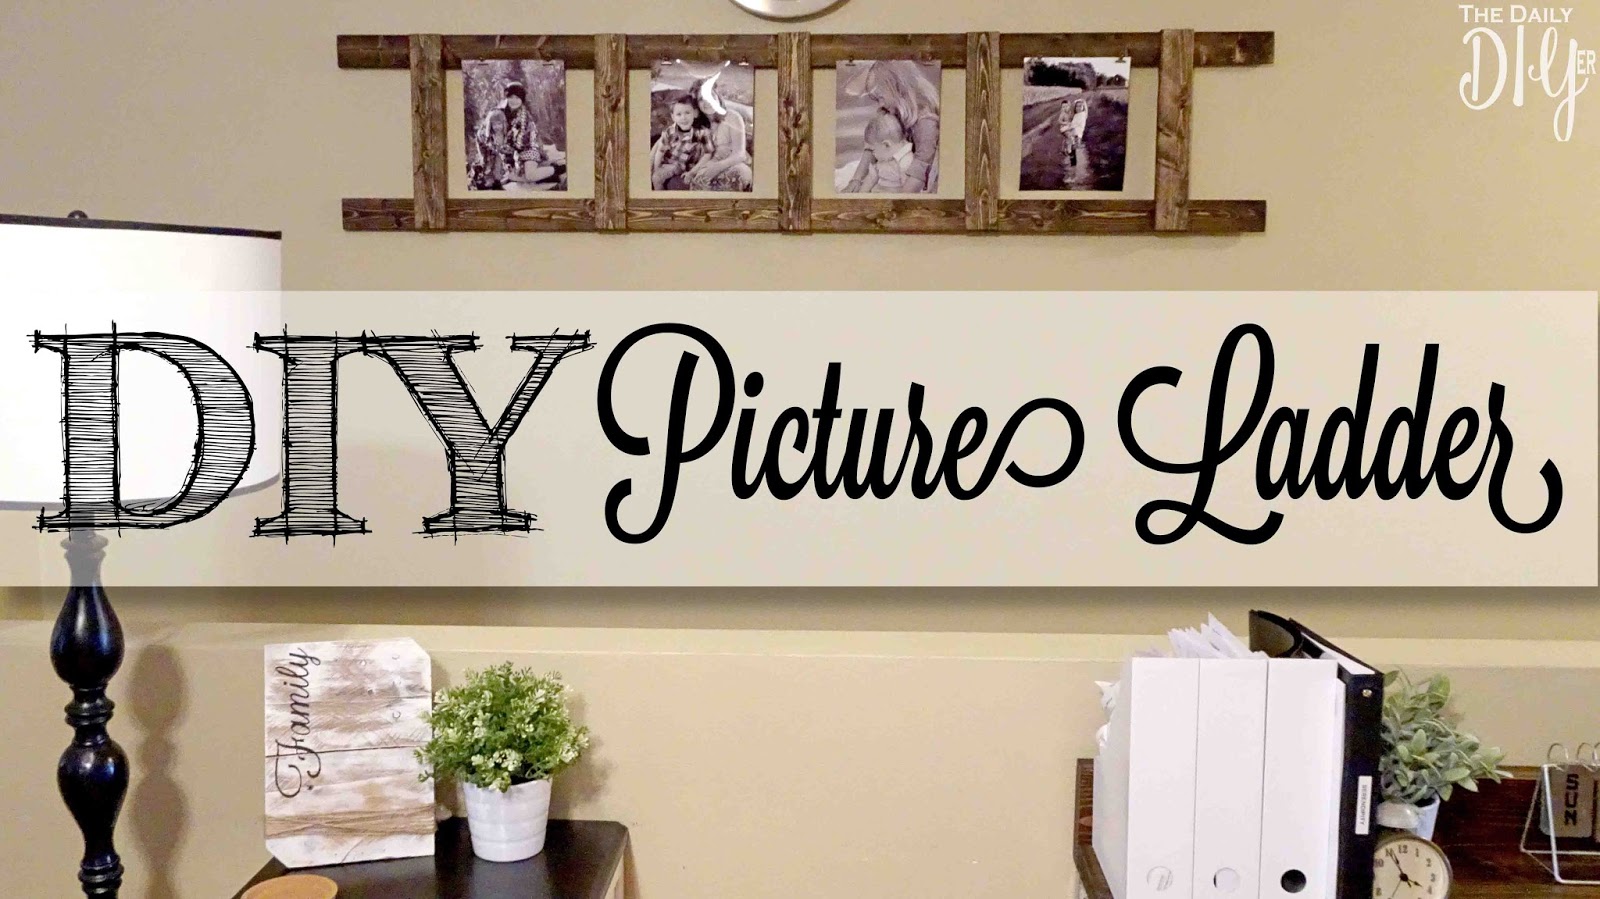
We have lived in our home for years and years now and this wall has always been bare. It is just a strange wall. It's over our basement stairs, there is pony wall in front of it, and the badly placed light made it hard to hang anything too large (since it can't be covered). It is a very difficult place to even get to, to be able to hang things up there. I had changed the light bulb in that light fixture and it was not easy, let me tell you.
A viewer and I were e-mailing back and forth about the best way to go about building a picture ladder. I had a light bulb moment when I realized I could take her design, turn it to the side, and use it on that awkward wall. It only needed two small nails to hang. Hubby and I teamed up, I got brave, and got this piece hung up. I am SO loving it! It's just want the wall needed. I may add something under it, but for now I'm just happy to have something up there finally! In the end, we ended up with a tutorial and hopefully a project that also inspires some of you. I hope you enjoy the video tutorial linked below!
I was on the hunt for new patio decor. I was really wanting a red and blue theme. I have had the same (but pretty) aqua and lime green porch for 3 years now. My cushions were pretty flat and the rug had some rust spots from the metal chairs on it. It was still fine, but I was being pulled towards this red/blue change of scenery.
I was able to find what I needed for the porch at Walmart of all places. I checked so many different places and so many were picked over. I even checked a bigger Walmart with no luck. Our little mini Walmart is where I found the rug and new cushions I had in my head.
Then it was time to decorate the new porch. Out with the aqua and lime green, and now in with the red, white, and blue. Thus, wood 4x4 firecrackers were born!
Organizing, when it comes to crafts, is sort of an uphill battle. Creativity gets messy! I do my best to keep things in order and put them back in their place when I'm done. That is the key to being able to find your supplies the next time you need them.
I have a good sized studio with all sorts of craft supplies, tools, and work space; however, it is in my basement. I actually really love my studio and it worked perfectly for me, before I had my son. Now that I stay home with him, I am upstairs much more because that's where everything is (kitchen, his room, food, etc.). That's where the craft closet came to life. It is our coat closet transformed into my craft storage area. I have everything in there that I use on a regular basis. I still need my studio for sewing, making hair bows, storage, my heat press is down there... on and on. So I am very blessed to have both spaces and have been able to make each space work for me and my family.
I recently added a ton of extra storage and color to my craft closet and wanted to share with you! I hope that you are inspired!